Ever wondered how hunters and nature lovers create those stunning, clean white deer skulls? It’s a process that can transform a raw find into a beautiful display piece. But getting that perfect, bone-white finish isn’t always easy. Many people struggle with finding the right method. Some methods can damage the bone, while others just don’t give the desired bright white. It can feel overwhelming to pick the best way to bleach a deer skull.
If you’re looking to preserve a trophy, create unique decor, or simply learn a fascinating skill, this guide is for you. We’ll walk you through the most effective and safe ways to bleach a deer skull. You’ll learn what materials you need, step-by-step instructions, and tips to avoid common mistakes. By the end of this post, you’ll have the knowledge to confidently achieve a beautiful, bleached deer skull.
So, let’s dive in and discover the best way to bleach your deer skull and make it a true showstopper!
Our Top 5 Way To Bleach Deer Skull Recommendations at a Glance
Top 5 Way To Bleach Deer Skull Detailed Reviews
1. Skull Bleaching Kit Trapping Supplies

Rating: 8.9/10
Unleash your inner taxidermist with the Skull Bleaching Kit Trapping Supplies! This kit makes bringing out the natural beauty of skulls simple and safe. It’s designed for anyone who wants to create impressive displays without the hassle. You can easily clean and whiten up to five skulls.
What We Like:
- It’s one of the easiest, safest, and most effective skull bleaching kits out there.
- The kit includes clear, step-by-step instructions.
- You can bleach 3 to 5 skulls with this kit.
- It comes with an organic and biodegradable industrial-strength degreaser.
- A skull wall mount is included, so you can show off your work right away.
What Could Be Improved:
- The kit might be a bit pricey for some hobbyists.
- While effective, the degreaser has a strong scent, so good ventilation is a must.
This Skull Bleaching Kit Trapping Supplies offers a fantastic way to prepare and display your finds. Get ready to transform your skulls into stunning centerpieces.
2. The Tannery Skull Bleaching Kit

Rating: 8.6/10
Transform your deer skull into a stunning display piece with The Tannery Skull Bleaching Kit. This kit provides a simple and safe way to achieve a brilliant white finish. It’s designed for ease of use, so even beginners can get professional-looking results. You’ll have enough product to clean two whole deer skulls.
What We Like:
- It’s non-toxic, making it safe to use.
- The kit is enough to bleach two deer skulls.
- The formula is simple and easy to use.
- It helps you create a clean, white skull for display.
What Could Be Improved:
- You need to buy extra supplies like a sharp knife, a large pot for boiling, and a bottle of 3% hydrogen peroxide.
- The instructions could be a little more detailed for absolute beginners.
The Tannery Skull Bleaching Kit makes preparing your trophy skulls for display a breeze. With a few extra household items, you’ll achieve a beautiful, bright white finish that showcases your hard work.
3. Skull Bleaching Kit Trapping Supplies
Rating: 8.7/10
Unleash your inner naturalist with the Skull Bleaching Kit Trapping Supplies! This kit makes it super simple to clean and whiten animal skulls. You can prepare up to five skulls for display. It’s designed to be safe and effective. You get everything you need to get started right away.
What We Like:
- It is one of the easiest skull bleaching kits to use.
- The kit is very safe for you and the environment.
- It works really well to make skulls look bright white.
- You get clear, step-by-step instructions.
- The degreaser is organic and biodegradable.
- It comes with a skull wall mount.
What Could Be Improved:
- The kit is designed for 3-5 skulls, so if you have more, you’ll need extra supplies.
This kit is a fantastic choice for anyone wanting to display cleaned skulls. It offers a simple and effective way to achieve professional-looking results.
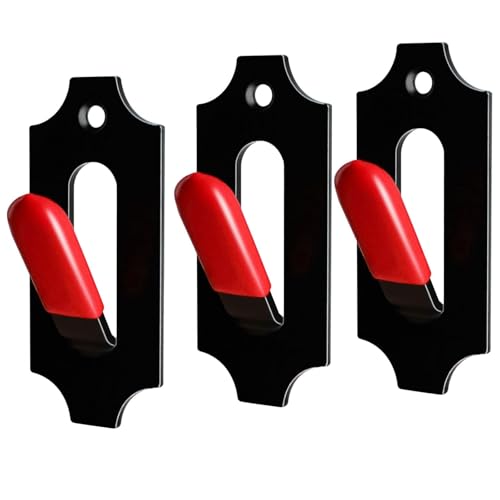
4. MSSOHKAN European Mount Skull Hanger Deer Skull Mount for Deer Mule Antelope Coyote and Small Game Animals with Silicone Protector Red 3 Pack
Rating: 8.8/10
Showcase your hunting trophies with the MSSOHKAN European Mount Skull Hanger. This 3-pack of heavy-duty hangers is designed to securely display deer, antelope, coyote, and other small game animal skulls. They offer a clean, professional look for your mounts, making them a focal point in any room.
What We Like:
- Built tough from stainless steel, these hangers can hold up to 20 pounds without bending or breaking.
- Each hanger includes non-slip silicone protectors that guard your skull against scratches and damage from friction.
- They’re super versatile and can display a wide range of animal skulls, from deer and goats to hogs and even bear skulls.
- Installation is a breeze. You’ll have your trophy mounted in minutes with just one or two screws.
- These hangers are great for both inside and outside. They have a rust-resistant coating and can even hold coats and hats when not displaying skulls.
What Could Be Improved:
- The description mentions a “Red” color, but doesn’t specify if other color options are available.
- While they hold a good weight, extremely large or heavy skulls might require additional support or a different type of hanger.
Overall, the MSSOHKAN Skull Hanger is a practical and protective solution for displaying your hunting achievements. It’s a simple way to elevate your trophy display with confidence.
5. DAOIDE Deer Antler Mounting Kit

Rating: 8.8/10
Show off your hunting trophies with the DAOIDE Deer Antler Mounting Kit. This kit helps you create a stunning European mount display for your deer skulls. It’s made from solid wood and features a cool USA flag design that’s burned and stained right into the wood. This plaque is a fantastic way to remember the details of your hunt. You can even write down your name, the date you got the trophy, the county where you hunted, and the antler score on it. It’s a great way to honor the buck and its story.
What We Like:
- Sturdy solid wood construction ensures your trophy is held securely.
- Unique burned and stained USA flag design adds patriotic flair to your display.
- Provides space to personalize with hunter’s name, date, county, and score.
- Makes an excellent and thoughtful gift for hunters, dads, and grandfathers.
- Helps you proudly display your hunting achievements for everyone to see.
What Could Be Improved:
- The product description clearly states the deer skull is not included, but it’s worth reiterating for clarity.
- While the wood is quality, some users might prefer a slightly larger or more elaborate design option.
This DAOIDE mounting kit offers a stylish and personal way to celebrate your hunting success. It’s a perfect addition for any hunter’s wall.
Your Guide to a Clean & Pristine Deer Skull
Getting a deer skull ready for display is a rewarding project. You want it to look its best. This guide helps you choose the right tools and techniques to bleach your deer skull safely and effectively.
Key Features to Look For in Bleaching Kits
When you’re ready to bleach a deer skull, you’ll want a kit that makes the job easy and gives you great results.
What to Expect from a Good Bleaching Kit:
- Powerful Bleaching Agent: The main ingredient should be hydrogen peroxide. It cleans and whitens without damaging the bone.
- Easy-to-Follow Instructions: Clear steps help beginners. Good kits explain every part of the process.
- Safety Gear Included: Gloves and eye protection are a must. These keep you safe from the chemicals.
- Sufficient Quantity: Make sure there’s enough bleach for your skull. You don’t want to run out halfway through.
- Storage Container: A sturdy container keeps the bleach fresh and prevents spills.
Important Materials for Skull Bleaching
You need more than just bleach. Gathering the right materials makes the whole process smoother.
Essential Items for Your Project:
- Hydrogen Peroxide (3% or higher): This is your main cleaning agent. You can buy it at most drugstores.
- Gloves: Protect your hands from the bleach. Rubber or nitrile gloves work well.
- Eye Protection: Safety glasses or goggles are vital. They stop bleach from splashing into your eyes.
- Container: A large plastic tub or bucket works perfectly. It needs to be big enough to fully submerge the skull.
- Water: You’ll use water to rinse the skull.
- Toothbrush or Soft Brush: This helps scrub away any remaining tissue or debris.
- Optional: Degreaser: If the skull has a lot of grease, a degreaser helps remove it before bleaching.
Factors That Improve or Reduce Quality
A few things can make your bleached skull look amazing, while others can ruin it.
What Makes a Difference:
- Proper Cleaning: Removing all flesh and tissue before bleaching is crucial. If you skip this, you’ll get stains.
- Soaking Time: Don’t leave the skull in the bleach too long. Over-bleaching can make the bone brittle and chalky. Follow the recommended times.
- Temperature: Warmer temperatures can speed up the bleaching process. However, avoid direct sunlight for long periods, as it can weaken the bone.
- Concentration of Bleach: Using a higher concentration of hydrogen peroxide (like 12% or more, often found in beauty supply stores for hair bleaching) can work faster. However, it also increases the risk of damage if not used carefully. Stick to 3% if you’re a beginner.
- Rinsing: Thoroughly rinse the skull after bleaching. This stops the bleaching action and prevents yellowing later.
User Experience and Use Cases
People bleach deer skulls for many reasons. The experience is usually hands-on and requires patience.
Why People Bleach Skulls:
- Display and Decoration: Many hunters and nature enthusiasts bleach skulls to display them as trophies or unique home decor.
- Art Projects: The clean white bone provides a great canvas for artists to paint or add other decorative elements.
- Educational Purposes: Skulls can be used in classrooms or for personal study of animal anatomy.
- Crafting: Bleached skulls can be incorporated into various crafts and DIY projects.
The process itself can be a bit messy, but with the right preparation and materials, it’s a manageable project. The satisfaction of seeing a clean, white skull emerge from the process is a big reward.
Frequently Asked Questions (FAQ) About Bleaching Deer Skulls
Q: What is the best way to clean a deer skull before bleaching?
A: You must remove all meat and tissue first. Boil or simmer the skull in water with a bit of dish soap. Scrape away any remaining bits with a brush or knife. Then, let it soak in a degreaser solution if needed.
Q: How long should I soak the deer skull in bleach?
A: This depends on the bleach strength and the skull’s condition. For 3% hydrogen peroxide, start with a few hours and check progress. For stronger solutions, it might only take 30 minutes to an hour. Never leave it overnight without checking.
Q: Can I use household bleach (like Clorox)?
A: No, do not use household bleach. It is too harsh and will damage the bone, making it brittle and chalky. Stick to hydrogen peroxide.
Q: Will bleaching remove all the yellowing?
A: Yes, hydrogen peroxide is excellent at whitening bone and removing yellow stains. You might need a second application if the skull is very stained.
Q: How do I protect the antlers from the bleach?
A: You can wrap the antlers in plastic wrap or aluminum foil. This creates a barrier to keep the bleach from touching them and potentially damaging their color or texture.
Q: What if the skull still has some brown spots after bleaching?
A: You can try a second, shorter bleaching session. Alternatively, you can use a paste made of baking soda and hydrogen peroxide and apply it directly to the spots. Let it sit for a while before rinsing.
Q: How do I store the bleached deer skull?
A: Store it in a dry place away from direct sunlight. Sunlight can cause the bone to yellow again over time. You can also apply a sealant for extra protection.
Q: Can I bleach a skull that is already old?
A: Yes, you can bleach an old skull. However, be extra careful. Older bones can be more fragile. Check on it frequently to prevent damage.
Q: What should I do if I get bleach on my skin or in my eyes?
A: Immediately rinse the affected area with plenty of cool water for at least 15 minutes. If it’s in your eyes, seek medical attention. Always wear safety gear.
Q: Where can I buy hydrogen peroxide for skull bleaching?
A: You can find 3% hydrogen peroxide at most pharmacies and grocery stores. Stronger concentrations (like 12%) are often available at beauty supply stores, but use these with extreme caution.
In conclusion, every product has unique features and benefits. We hope this review helps you decide if it meets your needs. An informed choice ensures the best experience.
If you have any questions or feedback, please share them in the comments. Your input helps everyone. Thank you for reading.
Hi, I’m Robert Contreras, a passionate archery instructor based in the USA. With years of experience under my belt, I’ve dedicated my life to mastering the art of archery and sharing its intricacies with enthusiasts of all levels. Through my website, 10Bows.com, I invite you to explore a treasure trove of tips, techniques, and personal insights that reflect my journey in the world of archery. Whether you’re picking up a bow for the first time or refining your skills, I’m here to help guide you toward precision, focus, and a deeper appreciation for this timeless sport.